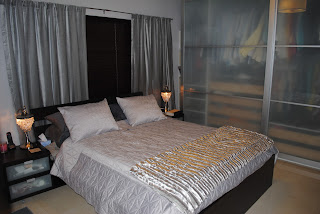
I've been wanting a bench for the foot of our bed for some time. We actually need a place to throw a pillow or a pair of jeans when we get home. Our room is a master from the 1950's which equals a tiny closet and no bathroom. A couple of years back, we built an Ikea wardrobe to have a place for our clothes. This causing us to lose about 2 feet of our already tiny room. Our furniture in the room consists of our low profile Ikea
bed, two tiny nightstands, and a hamper. Hence, the need for a landing ground for clothes...or a bench.
Please check out my
inspiration post, where you can see all the great ideas for benches out there. I drew my inspiration from each of these benches. Including the idea of actually making a bench myself, to using an old coffee table, and to buying the wood at Home Depot.
I found this table last week at a thrift store for $7.00. I loved the mid century style legs.
I flipped the table over and took off the brackets/plates that were holding the legs.
They were kind of rusty so I attempted a rust remover and ended up just spray painting them black.
I love the warm tone of mid century pieces, but these legs were in bad shape.
I sanded them down.
Stood them up on the brackets and applied a bit of a darker stain to match my
lamps.
One of the main reasons I wanted to make the bench myself, was because of the specifications that I needed. I wanted the bench to be 48 inches long and 12 inches wide or should I say thin. I bought a 12 by 2 piece of wood and had the guy at Home Depot cut the length to 48 inches.
I wrapped it with the same batting I used for my
upholstered headboard. I used what I had, so 3 layers is what it got. It could have been thicker, but I didn't want to spend any more money.
I stapled it all the way around, but left the edges unstapled so that we could add the legs as close to the edges as possible.
I ended up having to buy 2 yards of the zebra fabric because of the length of my bench. I cut it using the design of the pattern as a guide. I folded the fabric in half to get the exact center of the design.
I stapled all the way around except for the edges. You see the design in the center.
Mr. J helped me with the legs. He pre-drilled holes into the wood.
Screwed in the brackets as close to the edges as possible. Being that the bench is on the thin side, I wanted the legs to be as supportive as possible.
Attached the legs.
Now, I had to figure out how to get all that batting and fabric around the legs. I cut off some of the inside layers of batting and rounded out the fabric a bit and just stapled as tight as I could.
Here it is.
This project was so simple and has made a huge difference in our room. Our pillows are no longer on the floor. I think I may do another pillow with some of the leftover fabric. What do you think?
Total Cost Breakdown:
Table $7.00
Wood $8.00
Fabric $22.00 (But I have a ton left over)
Screws $1.50
Total $38.50 (all other materials were already on hand)
Linking up to: These Creative Juices, Hope Studios, Blue Cricket Design, Paisley Passions, The Answer is Chocolate, Finding Fabulous, My Repurposed Life, Remodelaholics, Tatertots & Jello, Funky Junk Interiors, Singing Three Little Birds, Boogieboard Cottage,
The Saturday Mornings Blog,
The Lettered Cottage,
Primitive and Proper,
Vintage Revivals,
Between Naps on the Porch,
Thrifty Decor Chick


