Monday, August 29, 2011

Our House is Being Painted

The painters showed up Saturday morning.  I impulsively hired them wanting to change the exterior of my house.  The number one comment we get when someone visits our house for the first time, is that they weren't expecting our house to look like it does based on how it looks on the outside.  It was pained a very bland, beigey yellow, that had faded over the years.  The furniture on our porch was very traditional looking and the brown, ceramic octagonal tiles are not doing anything for our curb appeal.  We redid the whole interior of our house and didn't touch the front of our house...AT ALL.  That's about to change and I am so excited.  I obviously have pictures, but haven't uploaded them.  So for now, I will leave you with my color choices.  All the paints are from Sherwin Williams.  The walls will be Pure White.

 The columns will be Gauntlet Gray.
 The door will be Decisive Yellow.
I would love to actually change my door to look something like this, but for now, I will take the color.
Pinterest
I have a bunch of ideas to improve our curb appeal. Including new pots, furniture, door mat, and maybe one day...new tiles.  It's just a matter of convincing the hubby that this is a great idea.  I'll post pictures soon, hopefully the weather holds up.

Thursday, August 25, 2011

Routine, Bleh

I'm still tyring to juggle going back to work, working out, blogging, working on projects, and actually keeping my house in decent shape. I'm not sure why, but my house is suffering the most...it's a mess, laundry not done, dishes in sink.   I find myself hitting the bed hard every night.  I was walking down the halls of school yesterday and I felt like I had never left.  Like those 2 1/2 months off never happened.  I saw this image on Pinterest the other day and I'm feeling the need to go sit in that field with some wine and enjoy the fall air.  
Enjoy your day!

Tuesday, August 23, 2011

Stenciling Away

We started working on my youngest sisters wall stenciling over the summer. I think this has been the longest, slowest project ever.  Stenciling takes a lot of time. It's not the actual work, it's letting the stencil dry in between. Basically, you stencil, wipe the back, hang it on the fan to dry quicker, and sit there counting how many more you have to do.  It takes hours...but it's worth it.  We bought the stencil from Royal Design Studio.  
This was our first square.  As we were driving over there, I was envisioning the wall about three times the size.  With that being said, the wall is big, but luckily not three times what I thought.
When we got there yesterday after work, this is what we had.  It's gorgeous.
We worked for five hours last night. I would say we are 90% done.  It's taken us 3 sessions so far.  I'll give you more details later, but I'm too tired to think.  We questioned a few times if it was worth paying the $1,000 for wallpaper.  I think we made the right choice.  Now, I have to go to work and be alert, ayy.

Monday, August 22, 2011

Zebra Rug Over at Knock Off Decor

My zebra rug is being featured over at Knock Off Decor today. 

 
My sister and I knocked off this rug from West Elm.

Thursday, August 18, 2011

Exterior Inspiration

I've been dreaming of fixing up the exterior of our house.  It's a 1955, flat roof house painted the dullest beigey, yellow you can imagine.  When we had our roof done, we had them stain the cedar fascia boards instead of having them painted.  The intention was good, but then life got in the way.  I would love to paint the exterior white, and add some color to our front door.  We have a wooden walkway up to the house that needs to be replaced and some 1970's octagonal brown ceramic tiles that are horrible.  There's something about this image below that is calling me.  Currently, my house looks NOTHING like this, but a girl can dream right?  I love the modern feel, the wood, the grey, the red door, and of course, the white.
Via Pinterest
So now, let's pretend my house was three times its size, maybe it could look like this.  For now, I will use the wood as my inspiration for my walkway and the white walls.
Via Pinterest
How about this one.  I want a pool and I want it to look like this.  Oh, yea, I want my house to look like that too.
Via Pinterest
What do you think of white houses? Will it be a pain to upkeep? 

Wednesday, August 17, 2011

Antiqued Silver Table

A few weeks ago, I shared this metallic paint with antique glaze finish side table on Craftionary.  I found this  table at a garage sale for $5.00.  It was faux painted in a wood/brown color.  I really had no idea what I was going to do with it, but the price was great.
Here you can see the texture on the top.
I applied spray paint primer and then I gave it a couple of coats of Rustoleum's Metallic Silver spray paint.  Here it is all nice and shiny.
I then used Valspar's antiquing glaze and gave it a light rub down.  I'm not a fan of heavy glazing, but I wanted some dimension to the piece.   I used a tutorial by Little Miss Penny Wenny (you must see the chair she did) and it worked out great.
Here you can see the top.  The glazing added some depth to the top. 
It gave the table a whole new life and it was such a simple fix. I painted it and called my sister to the house and she decided it was hers. Have you tried glazing furntiure before?  Are you a fan of heavy glazing? 

I got so much done at work yesterday and I'm totally inspired to keep going. I'll post pictures of my office as soon as it's all put together.  Thanks for all your sweet comments and words of encouragement.
I'll be linking up to these parties

Tuesday, August 16, 2011

Back to the Routine

It's over, my summer that is.  Today, I officially report back to school.  I've enjoyed my summer immensely. Spending carefree days with my mom, sister, and her two kids.  No schedules, no agendas, no meetings, no getting up in the morning...nothing. I love the freedom of summer, the texts "what's our plan for today?", and just having the ability to disconnect from reality for a couple of months. I realize that I have a job that allows me to do this, for that I am blessed.  Now, when I start complaining about going back, I realize I get no sympathy from my year round friends.  I was there, until about 3 years ago that they cut School Psychologists to 10 months.  That was the happiest day of my life (well, other than my wedding, the day of my nieces and nephews births, the...you get the idea). 

So I sit here about to start my day and I realize that my life goes in school years, that I am allowed a fresh start every August, and that the year is what I make of it.  Last year was my most difficult professional year yet, that's not bad for ten years of working.  I hope this year is a better, nothing can beat the trauma of last year.  So now, it's time to get out of my shorts, put on make up, and work clothes and get this year going.  I am a creature of habit, I crave routine, this is not saying that I am looking forward to getting back to work (for those of you who know me, know that these words will never come out of my mouth), but I am looking forward to my routine.  Getting back to blogging regularly, getting my life in order, and then needing summer to come around again so bad. It happens every year, routines are boring.  But for now, I need it.

Trying to get myself in the spirit of BACK TO SCHOOL, I've decided to fix up one of my offices a bit. In my base school, I have an office (it's also a storage room, but I will ignore that side of the room). I've had the same bulletin board for 6 years.  Actually, it was already there when I got there, I just changed out the inside. I left the white paper and the children of the world border that someone before me had put up.  I also have a certificate thanking me from 2007, yes, my friends 2007.  Either, I've gotten no certificates of thanks since, or I've been to damn lazy to change my bulletin board.  Well, that's about to change.  Fresh start my friends, I need it this year.  I bought a coral, grey, and white fabric for the board, a white border, and grey paper to line what I put up.  I know, I know, tell me how cute that is.  I printed out the name of our school using this alphabet bunting printable to place over my bulletin board.
 I printed this cute bird from free printable art.
The above printables were found via How About Orange, which is a site full of adorable free printables. The Back to School printable below is by Sweet Coconut Lime and I printed this one too.
I'm still coming up with ideas, but my time is now limited.  Remember, I work now. Ugh. 

Thursday, August 11, 2011

Guest Post - Directions Not Included

I'm so excited about today's Guest Post, my cousin Anna.  On Christmas Eve we got to talking about her new house and blogs.  I hadn't really told anyone about JandJHome at this point.  I told her my little secret and told her she should do it too.  I love that we have connected even more through our blogs and I LOVE her projects and craftiness.  I would have to say we are a pretty artsy/crafty family. Our dads are both architects, my mom's an art teacher, and her mom designs cakes.  We had to get the genes from somewhere. So before I keep rambling, go check her out. 

Hi there! I'm Anna and I blog at Directions Not Included. I'm excited to be guest posting today to show you what we have going on in our corner of the world. Jeanne is the reason I started blogging in the first place so I'm thrilled to be here. I've always been a huge blog reader but when we bought our major fixer-upper, J inspired me to start documenting the renovation process and all the decor projects I've been tackling. Craftiness and the desire to DIY runs in the family it seems.
 
We've been slowly but surely renovating every inch of our original (and ugly!) 1950s home ourselves. And just in case you think I'm exaggerating, here are a few befores:
Stylish backyard
Chic and modern kitchen
As slow as it feels some days, we are making progress and the place is starting to look more and more like a respectable home.
Backyard updates
Updated DIY kitchen - Still in progress
In addition to all our crazy renovation projects, I love crafting and experimenting to learn new techniques. Anything from basic sewing to paper wine charms and even monograms made from washers. A friend was craving a little sunshine in her life so I took a stab at making a stencil painting with handmade stencils cut out from computer print out.

And here is the finished product. If you want to give it a try, a full tutorial can be found here: Start being awesome
Thanks for letting me share. I hope you stop by my blog when you can! I've love to see you there :)

Monday, August 8, 2011

Synthetic Revelations

I hope you had a great weekend.  We spent some time at the Four Seasons in Palm Beach celebrating our 7th Anniversary. The room and service were exceptional.  I can get used to someone bringing me cold towels and frozen grapes while I lay on the beach anytime.  Well, sleeping in the luxurious bed they had to offer, with an enormous down comforter, I woke up HOT.  It got me thinking about how this happens to me often.  I got home and checked my comforter/quilt to see what material it was made of, and had an aha moment....100% polyester.  It's an oven cover.  No wonder there is no circulation going on while sleeping.  We keep dropping the air and it is currently at 67 at night and we still wake up hot.  I had been wanting a new comforter/quilt and I guess now I NEED one, of the 100% cotton variety.  I have been eyeing some of the quilt/comforters at West Elm and could not justify the purchase, so I waited.  Well, I'm off to West Elm today to do a little shopping.  This polka dot one is on clearance.  I think I saw it at the store last week (none left online).  It looks comfy and fresh, which is exactly what I want.  I'm not worried about the South Florida winters getting too cold, I can always just throw a throw (hmm) on top for those 2.2 cold days we get. 
I can't believe I never noticed what material our comforter was made of.  Silly me.

Thursday, August 4, 2011

Guest Post - Design Build Love

I'm so glad to introduce you to one of the sweetest bloggers (and she's also a redhead), Ashely from Design Build Love.  They are remodeling their entire house, which we did. I'm excited to follow along and see what they do. 

Hi y'all, I'm Ashley and I blog over at Design Build Love! J and J Homes happens to be one of my favorite blogs, so I am super excited to be guest blogging over here!
HEADER
If you happen to head over to my blog, you might notice that I often refer to my blog as "our" blog and that's because I have an amazing husband named Eric, who's always by my side to join in on each and every project I dream up! This is us:
summer-2010-319
We're just young, newlywed professionals who moonlight as designers/home-improvement-DIYers! We're always happy to try just about any home improvement or design project!

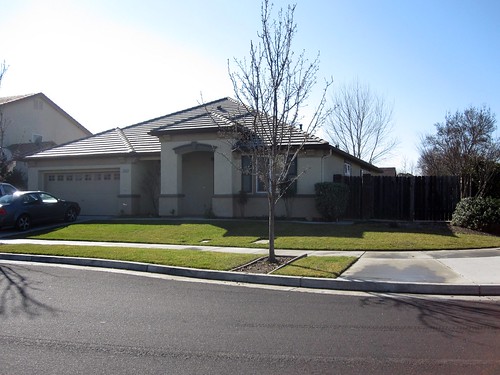
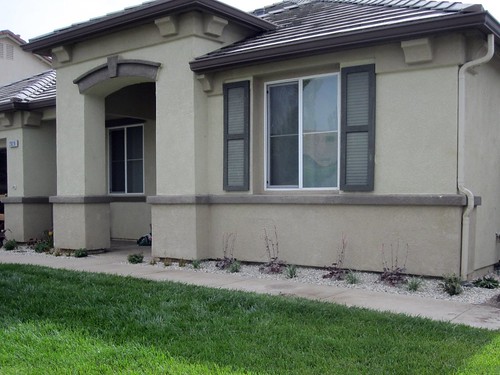
Anywho... on to the outdoors! If you follow our blog, it's no secret that we've been feverishly working on our front and back yards for most of the spring and summer, but I just thought I'd give you guys a quick snapshot of our front yard.

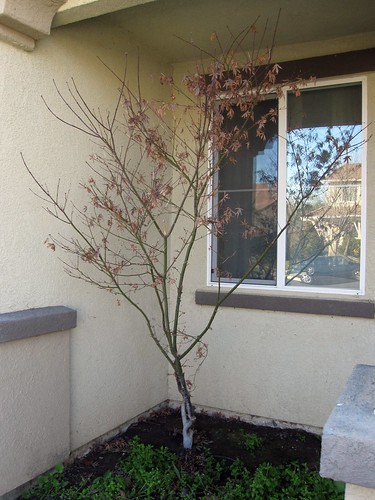
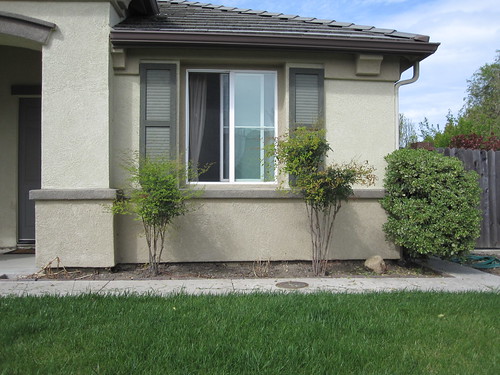
We started with a fairly unattractive situation when we bought our house. Things were ugly, poorly groomed, and sparse. It's safe to say that little love when into this from the previous owners...
122
126
IMG_1634
After holding out for a little over a year (while we tackled some major projects inside), we finally plunged, head-first into some major tearing out and prepping of the planters, and
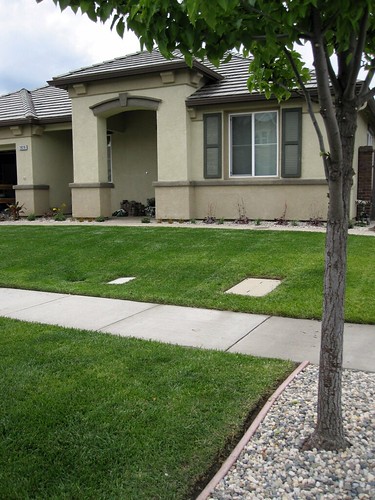
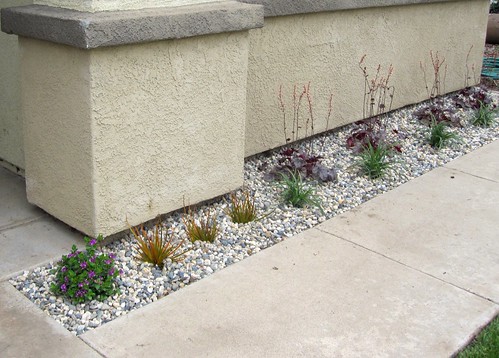
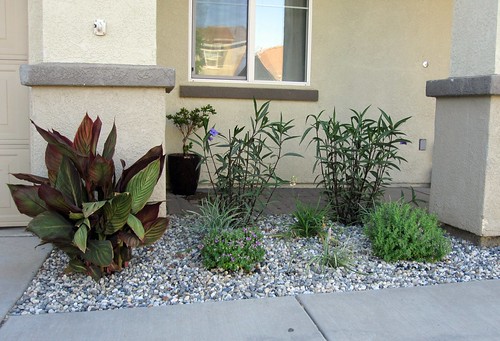
 ended up with this!
IMG_2119
IMG_2124 v 2
IMG_2071
IMG_2131
You can see more pictures of the process here and 
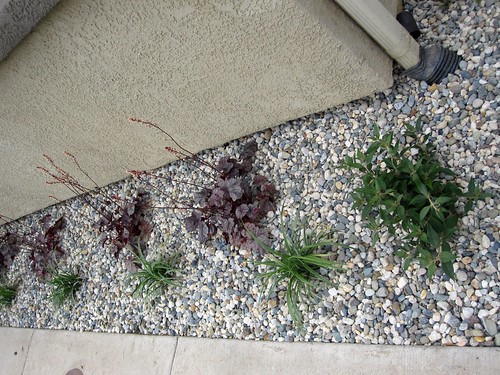
here, but our basic steps were tearing out everything, rototilling the dirt, laying a drip system, planting plants, placing weed cloth, and bringing in the rock to finish it off!

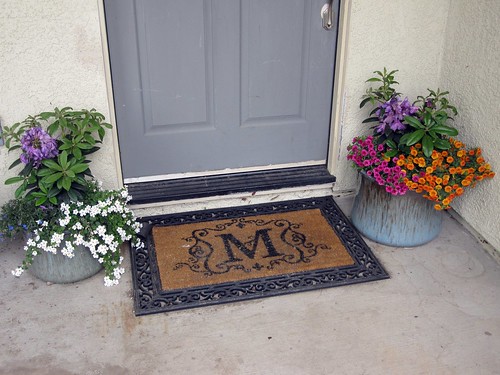
We even potted some flowers to make the front entry more inviting! (please ignore the unpainted strip on the door... it's temporary while we're refinishing our solid mahogany door) The pots were a sweet birthday score from my momma! Being the amazing shopper that she is, she snagged these heavy duty, painted pots at Ross for $12 and $15! Score!!! And they totally compliment the colors inside our home!
IMG_2128
Overall, we are absolutely IN LOVE with our new 
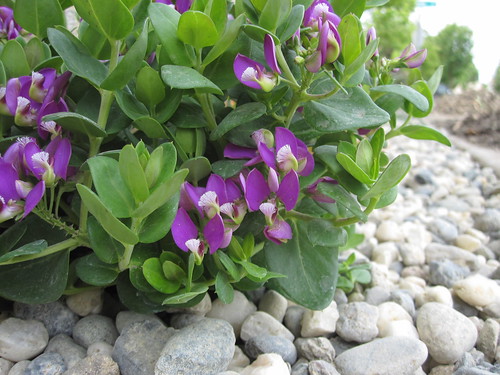
curb appeal! Our favorite things is probably the rock, the Mexican Petunias, and the Sweet Pea bushes.
IMG_2066
IMG_2061
All-in-all, we're super proud of what we accomplished and can't wait to see all of the plants flourish! DIYing all of it saved us some serious cash, as well as buying the less mature plants! So, cruise on over to the blog for updates on the growth! Oh ya... and see that paver patio just behind the plants... that's new too and we'll hopefully be DIYing a bench for that spot in the near future!!! After that, the bench just might be our new favorite thing!
IMG_2758
I hope y'all stop by our blog for a visit! We'd love to have you!

~Ashley

This reminds me that my house needs some major curb appeal. We lost a bunch of out trees when we had the house tented a year and half ago and...let's just leave it at that.  I'm so glad you all got to meet Ashley here today.  Go over there and say hi. 

Tuesday, August 2, 2011

Felt Flower Pouf

I am so excited about today's little project.  This is another project from my Pinterest - DIY to Try board that I've been wanting to try.  I pinned this flower pouf on Pinterest a while ago.  The Etsy shop is Live Life In Lime and she has the most adorable items in her shop. I would have to say my favorite is this felted flower pouf.  I absolutely love it.  This is not for the weak hearted, or the weak handed for that matter.  Unless you have one of those handy dandy electric scissors, be warned. I have some major respect for her, after making my own.  This pouf my friends, takes a lot, I mean a lot of cutting circles. 
I had this pouf in my family room that I bought on clearance at Target a few years ago.  There was nothing wrong with it, it (or I) just needed something new. 
I bought a grey fabric and cut out two circles for the top and a long strip for the sides.
Here's where my mom came in.  She's been teaching me to sew.  Right now, I'm on straight lines.  I have that down.  This, however, required some fancy work.  Along the side panels we sewed a stitch and then you pull one of the threads and scrunch it to create the roundness for a circle.  Sounds more complicated than it actually is.  Here's my mom showing me how to do it.
Then you pin it to the round piece of fabric and sew it on.
I bought a yard of grey felt and a yard of cream colored felt. I cut long strips and then cut them into squares.  My mom lent me an electric scissor about half way into me cutting and it was a life saver...no sorry, hand saver (if that makes any sense).
I cut the circles about 2 inches.
I also cut a larger circle of about 8 inches as my base.
Then I just started gluing.  My first layer is on the outer edge. Place the circles as far out as possible as it makes the flower bigger. The bigger the better (less you have to make).  I used Fabric-Tac from Joann Fabrics.  I imagine sewing them on would have been a great idea, but this glue seems to be pretty strong. 
Just keep going around and around until you get to the center.
Then I cut out what seemed to be three attached circles (I forgot to take a picture) and I hand sewed a stitch to the center to give them this shape.  I then glued it to the center of the flower.
I added a bunch of the glue to the back.
I then glued them to the pouf.
We had left the seems open to insert the cushion, so I just hand sewed it closed.
Keep gluing and gluing until you get this.
Here it is in my family room.
I would have to say this is one of my favorite projects. It looks beautiful in my family room and adds just the right amount of whimsy (this is so not a word I use, hmm) to my modern space. I can imagine this in shades of pink in a little girls room.  If you plan on tackling this, it's not as scary as it looks, it just takes time.  I have a total of 17 flowers with about 45 petals on each.  What do you think? 

I am participating in the Young House LoveBower Power, Joey and Lana, and Emily Henderson's 

I'll be linking up to these parties
Related Posts Plugin for WordPress, Blogger...