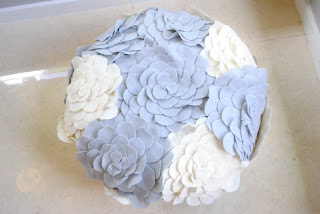
I had this pouf in my family room that I bought on clearance at Target a few years ago. There was nothing wrong with it, it (or I) just needed something new.
I bought a grey fabric and cut out two circles for the top and a long strip for the sides.Here's where my mom came in. She's been teaching me to sew. Right now, I'm on straight lines. I have that down. This, however, required some fancy work. Along the side panels we sewed a stitch and then you pull one of the threads and scrunch it to create the roundness for a circle. Sounds more complicated than it actually is. Here's my mom showing me how to do it.
Then you pin it to the round piece of fabric and sew it on.
I bought a yard of grey felt and a yard of cream colored felt. I cut long strips and then cut them into squares. My mom lent me an electric scissor about half way into me cutting and it was a life saver...no sorry, hand saver (if that makes any sense).
I cut the circles about 2 inches.I also cut a larger circle of about 8 inches as my base.
Then I just started gluing. My first layer is on the outer edge. Place the circles as far out as possible as it makes the flower bigger. The bigger the better (less you have to make). I used Fabric-Tac from Joann Fabrics. I imagine sewing them on would have been a great idea, but this glue seems to be pretty strong. Just keep going around and around until you get to the center.
Then I cut out what seemed to be three attached circles (I forgot to take a picture) and I hand sewed a stitch to the center to give them this shape. I then glued it to the center of the flower.
I added a bunch of the glue to the back.
I then glued them to the pouf.
We had left the seems open to insert the cushion, so I just hand sewed it closed.Keep gluing and gluing until you get this.
Here it is in my family room.
I would have to say this is one of my favorite projects. It looks beautiful in my family room and adds just the right amount of whimsy (this is so not a word I use, hmm) to my modern space. I can imagine this in shades of pink in a little girls room. If you plan on tackling this, it's not as scary as it looks, it just takes time. I have a total of 17 flowers with about 45 petals on each. What do you think?
I'll be linking up to these parties


46 comments:
Wow! That looks wonderful, amazing job :)
Connie
That is an Amazing commitment and of course it looks great! xox!
Amazing! What a fun idea. You are so creative! Thanks for visiting my blog last week! I'm a new follower.
I LOVE this!!! It would look great for newborn pics!! OR in my living room ;) Fabulous job!
That might be the cutest thing I have ever seen! And you have some patience, to do all of those petals. Good job!
I have LOVED that pouf since I first saw it. I may have to try making my own too! It looks great!
It came out beautiful!!
It turned out awesome!
amazing. it looks great.
So cute!
Wow! It looks great. I absolutely do not have the patience to do something like this. Bravo.
Gorgeous!!
what the? that is BEAUTIFUL! now i need to find an ottoman and get cutting! thanks for partying with me!
THIS IS SO NEAT! FOUND YOUR BLOG VIA YOUR COMMENT....LOVE YOUR HOME!!!!!
SO cute!!! Love it!
Have your hands recovered from all that cutting and gluing yet? The pouf is so cute!
I also wanted to let you know that I'm presenting you with the One Lovely Blog Award. Congrats!
http://www.imbusyprocrastinating.com/2011/07/one-lovely-blog-award.html
I'm not a huge pouf fan but this is really awesome and it's DIY - bravo sister! Looks great in your living area and could be great in a basement, playroom, or nursery. Nice job.
This is absolutely adorable! I thought about it today again while I was driving. I have never been to Pinecrest but I signed up last night. Now I just need to take the time to go figure it out. I may do a couple of these in my daughter's room. I saw a show on HGTV that I've never seen before called HIGH LOW and they made a pouf with Ikat where they make the inside with wood and foam backing. Super cool!
Oh for Pete's sake. Can you stop being good at everything for a second? ♥
This is so fabulous! I can't imagine how long it must've taken, but well worth it!! Enjoyed your blog!
Would you mind if I shared this on my blog with a link back to you?
thanks!
Oh mother of all things felted! I'm so proud of you! LOL The last project I did that was this daunting was a 1x1in paper tile mosaic and omg never again! LOL. Your poof (or whatever it's called) is totally AWESOME!
I hope you will come share this at my VIP party today. http://designergarden.blogspot.com/2011/08/vip-party-22.html
You never cease to amaze me! This is just so fresh and elegant. Love it. Thanks for linking up to this week's BFF!
Ohhhh! It's so pretty!!
Super cute! I love how it came out.
this is SOOO AMAZING! I hate using a sewing machine (it's me, not you) but I could totally manage a few of these AWESOME flowers to put on a throw pillow. Thanks for the inspiration!!!!
Wow - a lot of work, but it came out so good!! LOVE! I think I may need to pin yours!! I would love it if you would come link this up to Saturday Social. Thanks for sharing the tutorial!!
http://socialsalutations.blogspot.com/2011/08/saturday-social-week-11.html
- Jenn @ Social Salutations
This is so cute! And oh my I am so impressed with your skills! My hands definitely wouldn't have held out for this work of art. Kudos!
Very fun, looks like a lot of work! I have never heard of electric scissors before. I need me some of those and a mom that will help me like yours. Thanks for the tutorial!
What an excellent idea! The pouf is very useful, but also a bit dated. With all the work you've done, you have given it a new lease on life, making it a room feature. Lovely.
LOVE it! It looks awesome in your living room! You did an awesome job!
Wow, that's amazing! Love it!
This is so beautiful. I can understand how difficult the task of cutting would have been. So many circles... good job!!
I am hosting my first link-up party - Tea Time Thursdays @ Kreative Korner. Would be glad to see some of your awesome posts there. Hope to see you at the party.
http://tanyaanurag.blogspot.com/2011/08/celebrating-one-party-time.html
Wanted to let you know that I featured this as part of my "Blog Feature Friday Open House" wrap up! Come grab a featured button from my sidebar if you like :)
Just a great job! Thank-you for posting it...inspiration!
We need creative souls like you! Please consider being apart of Miracle Makeover Week for kids with cancer... Met Monday will feature next week...for more on how to create a post for it go to www.designgivesback.com
love, kelee
These are so adorable for pictures! I love the flowers used too - they can be used on a lot of different projects! It looks great!
~Jessa
www.jessajill.blogspot.com
What an awesome pillow! You did an amazing job, so pretty! I'd love for you to link up at my Tuesday Tutorials link party! I'll be hosting one every Tuesday, the link is open now :) Hope to see you there!
http://www.thekurtzcorner.com/2011/08/tuesday-tutorials-link-party-1.html
That is gorgeous! I need one of those! We would love for you to share this at our link party and come enter our free digital scrapbooking software giveaway!
Love,
The Sisters @ Six Sister's Stuff
http://sixsistersstuff.blogspot.com/search/label/Strut%20Your%20Stuff%20Saturday
http://sixsistersstuff.blogspot.com/2011/08/my-memories-digital-scrapbooking.html
So so pretty!!! Thanks for sharing your creativity in the DIY Project Parade! Love seeing what you've been up to! ;)
I love it! It goes perfectly in your living room! Everytime I come to your blog I am always in envy of your great ideas. The pouf is awesome!!!
I am featuring you today on SJ!!!
Halz
Sooo purty!
I still can't get over your ceiling. Super jealous.
It's beautiful! You did an amazing job, I featured this on my Friday 5! Have a great weekend!
I have been looking for this for a couple of years now. Thank you so much! The original version is pretty pricey and is from Modern Dose! It comes with a price tag of 438.00
I just LOVE your flower pouf. I think I will have to try this. Thanks for sharing the idea
I have made one of these myself.. I used a big shot and circle die#2 to cut my felt circles.. MUCH EASIER than hand cutting them!!!
You did an amazing job!! I'll be making one for the nursery (hope so). Thank you very much for the DIY tutorial.
Post a Comment