Showing posts with label paint. Show all posts

Monday, September 12, 2011

Easy Palm Tree Art

I have a really easy project for you today.  I got the idea from one of my best friends and thought it was perfect.  My sister, Jessica, was looking for more pieces of art for her walls.  Using a large piece of card stock or even the paper that comes with the frame flipped to the back side, if white.  Grab a branch from a palm tree.  We tried a couple before finding the one we liked.   This one here was not flat enough.
Then we found this one in my yard that was perfect.  Lay it on the paper in an angled direction
We then spray painted right over the branch.  The individual leaves seemed to lift a bit as we sprayed. This is not a problem.
Here it is.  You can see some of the over spray that got under the branches when they moved.  It actually gives it a nice effect.
We then placed it in a frame from Michael's.  (Which there happens to be a 50% coupon on my sidebar right now).
Here it is in my sister's little nook.  You can see it here with the zebra rug and the fabric memo board.
She found this beautiful mirror table at Pier 1 Imports. 
I love how the palm tree art looks with the zebra rug.  Do you have any easy art ideas?

I'll be linking up to these parties

Friday, September 9, 2011

How to Paint a Terra-cotta Pot

I've been on a search for decently priced grey stone pots for my front porch for a few weeks. I was actually shocked at the price of large pots.  One that had the colors I was going for, the size I wanted, but the wrong shape was $89.00 and that was the cheapest they had.  Wanting two of them, I knew that I could not dish out $180.00 for pots for my front porch.  I decided to check out Home Depot and found these terracotta pots for $27.00 each.  I bought them on the spot.  I called my mom and asked her if spray paint would do the trick and her answer was a big NO.  The paint won't stick and would likely peel off.  Ugh.  Not the answer the master of spray painting everything was looking for.
Luckily, I had been contacted by Decoart offering me some paints to sample.  I sent them an email asking if they had anything that would do the trick for my new pots and the answer was a big fat YES! I think I jumped up and down a bit.  They have a line of called Patio Paint that is specifically for use on concrete, terra-cotta, wood, masonry, stucco, stone, ceramic bisque, cast aluminum, and Styrofoam. Cue the stars aligning.  I emailed them with the color ideas I was looking for and they suggested the colors below. 
I gave the pots a coat of Eucalyptus Green just to get rid of the orange.  I wasn't really sure what technique I would be using for this, it was all a fly by the seat of my pants, and cross my fingers it worked.
I then mixed Wrought Iron Black and Sterling Silver.  I would say I used about 2/3's black to 1/3 silver.  I did not fully mix the paint to get both colors showing through.
I used an old T-shirt and just swept the rag across the pot starting from top to bottom. 
Then I mixed Glorious Gold, Woodland Brown, and a bit of Sterling Silver.  I did the same drag the rag technique for this layer.  I wanted the pots to have dimension and not just slap on a layer of grey/black paint and call it day.  When I finished this layer, I actually loved the look. It had a bit of a bronze/copper feel to it. If my colors had been in the browns, it would have stayed just like this.  You can see some of the darker layer peaking through.
Finally, I got Wrought Iron Black, Sterling Silver, and a bit of Glorious Gold and did the same technique.  You can see below the rag technique. Oh yea, I also put a coat of Clear Coat on top further protect the paint. I loved the texture that the paint has. I find the texture of Terra-Cotta pots to be kind of like a nail scratching a chalkboard. These particularly had a rough texture, and it's gone. They are super smooth right now.  I loved playing around with the different paint colors. I think there are tons of combinations that you could do.  This paint is just so easy to use.
Here it is on my front porch.  I LOVE them, like really LOVE them.  I can't believe they were $27.00 each and some bottles of paint. 
I really want to thank Decoart for sending me this amazing paint. I am beyond happy with the results.   I can't wait to see what else I can paint.  Have you tried Decoart Paints before?  Have you ever painted Terra-Cotta?  Do tell...

I'll be linking up to these parties

Wednesday, September 7, 2011

Some Pictures of Our Newly Painted House

I'm still trying to recover from a fantastic weekend.  A group of 6 of us went on a girls trip this weekend to Orlando, Florida.  The group Erasure was playing at the House of Blues on Friday night and we used to love them in high school.  We had a blast. We spent all day Saturday shopping.  It was a total girls weekend.  I was beat yesterday.  Even as tired as I was, I got out to Michael's to start working on my fall wreath for my new yellow front door.  Here's a photo of our house below. The bench and pillow are what started this whole curb appeal project. The house was not bad, just bland and much in need of some plant grooming and excitement.  We had changed the light fixtures a few years ago and the house numbers to stainless steel ones.  The ceiling in the porch had never been stained and the door had been stained by us a dark brown.  It just read boring. The color here looks whiter than in person. It was a light beige that actually seemed washed out.
Here it is all painted and pretty.  We had the columns painted grey, the walls white, and the door bright yellow.  (I hazed out our house numbers, but they match the lights.)  I had just hosed down the porch and realized that I should be taking pictures of our newly painted house, so pardon the wet, shiny floors. You can see the wood ceiling was stained to match the fascia boards.
So you all know, there's this thing that happens with me often.  I find something I love (the bench in this case) and it catapults into a million projects and a million dollars (well, not that much, but it sure feels like it).   I've now decided I want to:

Replace the ugly brown tile
Replace our wooden walkway
Add lights along the wooden walkway
Replace the non functioning fan in the porch with some kind of light fixture
Redo our driveway (for now repaint asphalt)
Replace our windows
Replace our haphazard and random landscaping to the left of our house
Add mulch or pine bark
Manicure ferns under the oak tree
Get a new mailbox
Replace pots on our porch (already working on this)
Reinstall garden lights to light up the trees, especially the oak
New mat for the porch (working on this)
Paint doorknob and lock
Make a wreath for the front door (supplies purchased)
Fix the pond (our cleaning lady filled it with dirt and leaves, it's a disgusting mess)

And...all this without spending a lot. I love it.  If only my husband liked DIY as much as I do. :(

Tuesday, November 23, 2010

Family Room

I finally think I have the family room where I am happy with it.  I haven't decided what to do with the windows, so I will just leave them as is.  The color is Sherwin Williams Anew Gray, but we had the store add in a little bit of Sherwin Williams Mega Greige just to deepen it a little bit. The color works so well in the space, I actually love it.

This is a reminder of the before (when we bought the house). Lovely isn't it?

Here is the after, I tried to get the same angle.  This is what you see as you walk into the room.  We removed the paneling and the fireplace and put in two sets of french doors. We changed the windows, floors, and added central a/c.

This before is the angle from between the couches. 

We widened the opening and got rid of the wood patch up on the wall, allowing our kitchen to be open to the family room.  It allows for better flow and these two rooms are the most used in our house.
. 

This angle below is standing by the kitchen.  We chose two full sofas, instead of a sectional. We love the amount of seating and comfort of the sofas.

Here is the angle standing in front of the TV looking at the main entrance of the family room from our dining/living room.  We have some custom made frames (I had to blur the pictures as per my husbands request, he's not sure about having his face on the Internet.)    

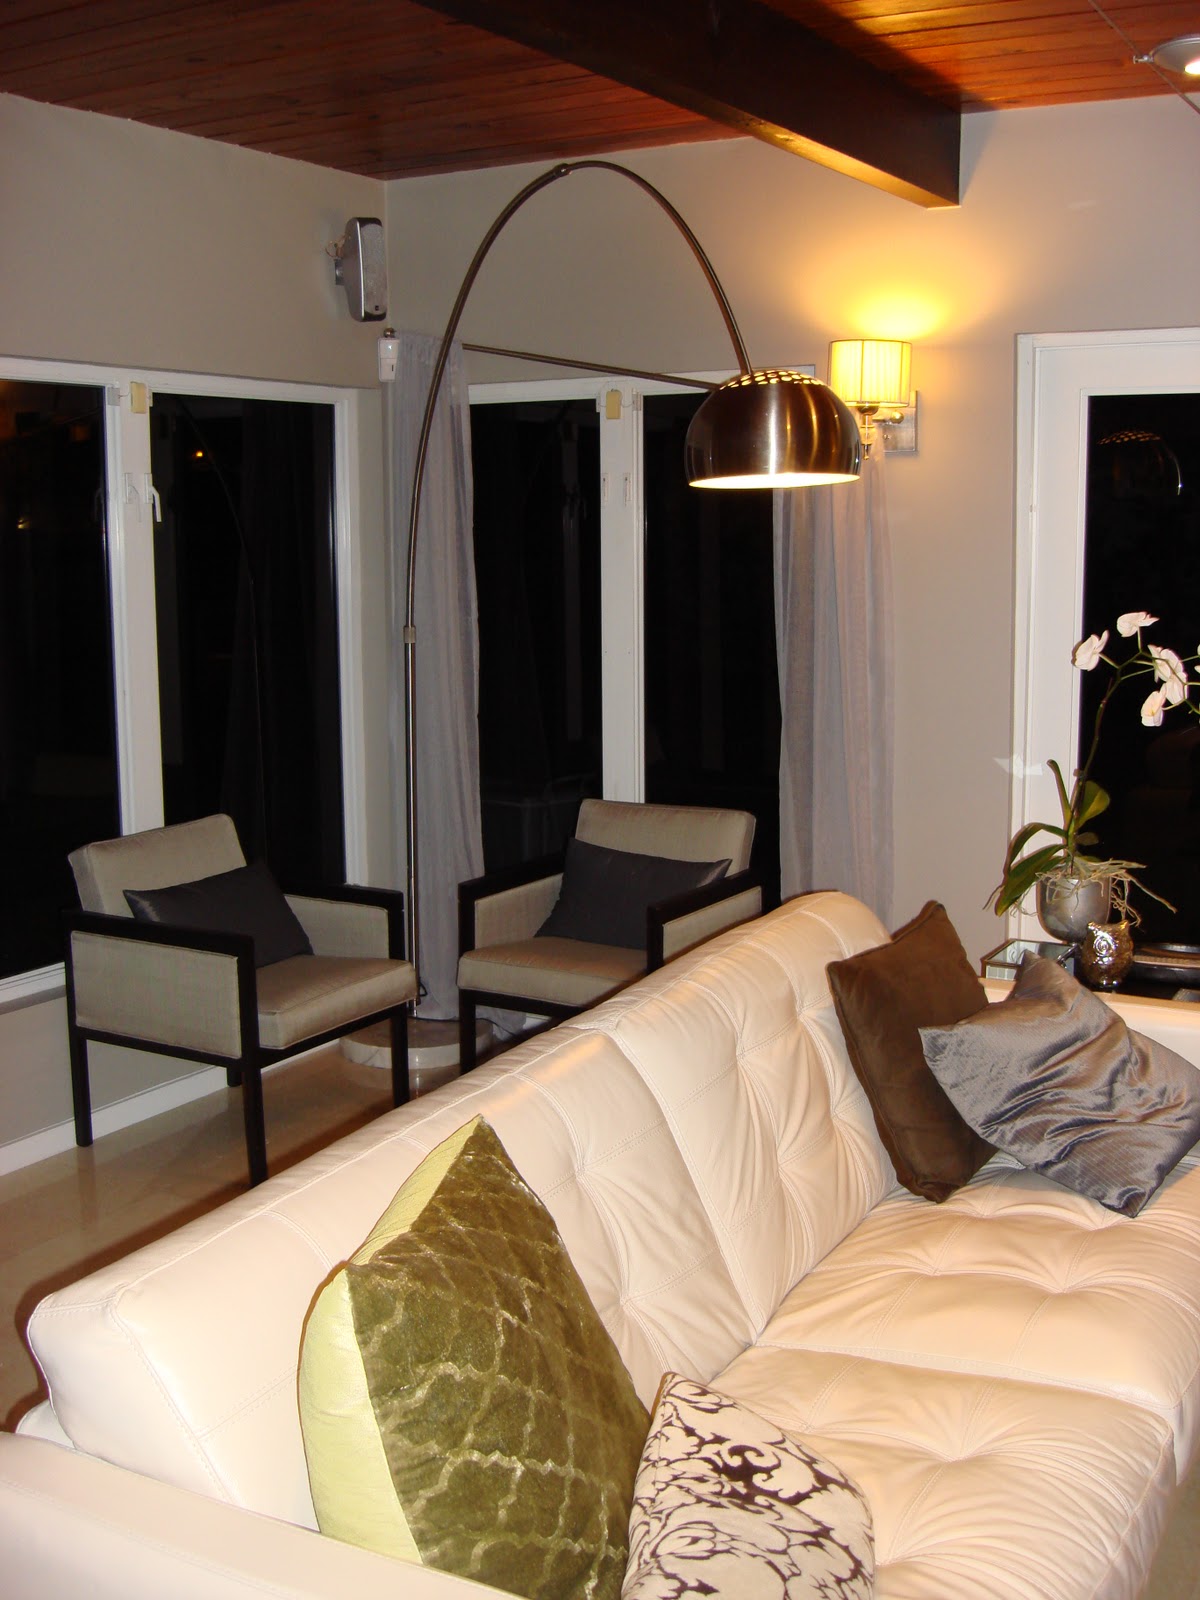
This is the same entrance mentioned above, looking into the family room.  Here we have a little seating area with my inspiration chairs and arc lamp.  This is basically what started this entire family room redo.  The garden stool was found at Big Lots last spring for $20.00.  I had intended to put it outside, but thought it added something to this corner. 


 Here's a close up of some of the pillows and our Kas ripple throw.  I've had the pillows for a while.  The damask one is probably 3 years old from CB2 and the green one is from ZGallerie on clearance last summer.   

I am very happy with how the room turned out.  It feels warmer and making the move away from beige walls was long overdue. What do you think?

Tuesday, November 9, 2010

Curtains or No Curtains?

My family room is almost complete, well actually, it's at a complete standstill.  I want curtains, the husband not so much. Actually, he is refusing.  I love curtains, always have.  Every time I redecorated my room at my parents house, I would change the curtains. 

Right before moving in, we had wooden mahogany blinds put up in the whole house (which I hated the day they went up), except for our family room.  We could not agree on what we wanted, plus we loved the almost 180 degree view of our backyard, so we left the windows bare.  I still love that view, but I have always felt the room was missing something.  So when we painted the family room, I found the perfect curtains for the room.  I set/propped it up on our alarm and wall sconce and waited for my husband to get home.  No Go.  I have left it there hoping he would get used to it and give in.  Still not happening. 

In this first picture, I have the curtains propped up. Excuse the slantedness. (I know it's not a word)

Here, no curtains.

Same here, curtains.
No curtains.

Here is the view of the open windows during the day, while we were having it painted.  Sorry the previous pictures are at night.
Being that I am not a designer, I am also struggling with the fact that I have so many doors and windows.  Is it OK to just put curtains on the 4 corner windows, or do I have to put curtains on the doors.  I imagine this is a personal preference, but I really need help.  I am thinking just the windows, the curtains are a gray sheer, and I would not necessarily be drawing the curtains, so the view would not be obstructed.  Any suggestions/ideas?  Oh, and any suggestions on how I can convince the husband that we need these curtains? 

Wednesday, November 3, 2010

We have paint-in the Office

I was able to muster up the energy to take some pictures today.  Of course, that is after taking a little nap watching HGTV this afternoon.  I realize that some mistakes were made in painting my office.  First one, is that I did it.  No really, I did not use primer.  I was painting over a blue/green color in white and did not use primer.  I have not painted any rooms in my house since I painted my room at my parents house a pretty shade of lavender many, many years ago. The picture below is the same one that I posted yesterday, but now in white.

I have been searching for rugs for a couple of weeks now.  I happened to find this one at Ross for $18.99.  The size is right for my new layout, it doesn't interfere with my desk chair and the price was great.  The beige is almost an exact match to my chandelier. 


Since we will be keeping the black leather couch, I found these cushion covers at Ikea.  They were too big for the pillows that I had, so I had my mom sew them to size.


It's starting to come together. I found a lamp yesterday at Goodwill that I'm working on.  I'll let you know how that goes.

Tuesday, November 2, 2010

Painting my Office

I decided to repaint my office. When we bought our house, we had painting contractors do the job. Our paint was flawless.  We chose mostly neutrals...well, beige in most of the house, except for our office.  We painted it Sherwin Williams Waterscape.  I have always loved the color, but it was not matching my new office ideas, plus it was all nicked and dirty.  When we repainted our family room, we hired some handy man/painter, they did a decent job.  So I decided to paint the office myself, what a disaster.  It has taken me 2 days, about 10 hours, 3 coats of paint, and I have finally finished.  I am covered in paint, but it's done. I painted it Sherwin Williams Extra White.  I don't have any pictures yet, I can't move my arms to lift the camera.  That's right, every part of my body hurts.   The picture below is the color before. 


I will have pictures tomorrow.  If I can move.
Related Posts Plugin for WordPress, Blogger...